Published: August 18, 2019
How to run your Selenium tests in Distributed Test Execution Environments
Selenium is a great tool to automate your web browser actions. However, its application is not limited to local use. Imagine that we need to run our tests on several machines at once, or on different system configurations, in different browsers, and so on. We can think of some way to automate the synchronous launch of local instances, but Selenium has a good ready-made solution for this case – Selenium Grid.
Selenium Grid Step-by-Step
1) Download Selenium Standalone Server. At the time of writing, the current version is 3.141 which is what we will use. This file can be used by both the client and the server, so it should be placed on each of the machines you plan to use.
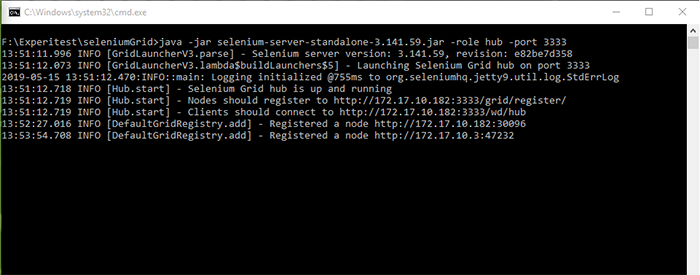
2) Run the Selenium hub, using the following command line:
java -jar /somePathToJARfile/Selenium-server-standalone-3.141.59.jar -role hub -port 3333
Tips:
a) Here the “-port” key is optional. If you do not use it, then the default port 4444 will be used, however, if it is busy, then you can use any free one.
b) When used on a real project, you will have to do the launch more than once. This means it makes sense to immediately simplify and automate this step. The easiest way is to use the bat / sh file.
At the startup, you will see the following:

After starting the hub, you receive instructions on how to register and connect the nodes (clients-slaves).
http://localhost:3333 (you can use your IP address instead of “localhost” and the port instead of 3333) in your web browser to check the status of our distributed system.

As you can see in the screenshot above, the Grid Console works at the specified address. It’s empty until we don’t register a slave.
3) Now we need to start the Selenium nodes. Suppose we plan to run 2 instances, one on the local machine (where the hub is located) and another on the remote machine. To do this, use the following command on each machine:
java -Dwebdriver.chrome.driver=F:chromedriver.exe -jar /somePathToJARfile/Selenium-server-standalone-3.141.59.jar -role node -hub http://172.17.10.182:3333/grid/register -browser browserName=”chrome”,version=ANY,platform=WINDOWS,maxInstances=5

Tips:
a) Here the parameter -Dwebdriver.chrome.driver=F:chromedriver.exe indicates that this client instance will use a chrome driver, and the chromedriver.exe file is in the root of the disk F.
b) -role node parameter means that we run the instance as a node.
c) -hub http://172.17.10.182:3333/grid/register parameter is the path where our hub is located (it can be recognized from the hub console).
d) -browser browserName=”chrome”,version=ANY,platform=WINDOWS,maxInstances=5 This part defines the browser launch options.
e) we can add the key -port, but if you do not specify it, then a free port will be selected automatically.
Now let’s make sure that all nodes are successfully registered on our hub:

4) Now we need to create a Java project with Selenium tests that we will run. For this:
a) In the IDE you use create a new java Maven project with default settings (I’m using IntelliJ IDEA)
b) Then add the java class ParallelTest.java

c) Import the necessary Selenium tests, and TestNG libraries:
import org.openqa.Selenium.Platform;
import org.openqa.Selenium.remote.DesiredCapabilities;
import org.openqa.Selenium.remote.RemoteWebDriver;
import org.testng.annotations.BeforeTest;
import org.testng.annotations.Parameters;
import org.testng.annotations.Test;
import java.net.MalformedURLException;
import java.net.URL;
Later we will discuss why we need annotations. After importing the libraries, you have to allow the IDE to add all the necessary dependencies.

d) Add the next code into our ParallelTest{} class:
public RemoteWebDriver driver;
@BeforeTest
public void beforeTest() {}
@Test
public void experitest(){}
Here:
@BeforeTest and @Test are TestNG annotations.
beforeTest(), experitest() are methods.
RemoteWebDriver is imported class.
e) We need to run the test in the current state in order to ensure that everything works correctly, and in order to get the default TestNG configuration file:

In the IDE console, we will see the results of execution. Click the info line in this section to get more information.

After that, the path to the newly created config file will appear at the top of the screen:

Go to this directory and transfer this file to our project folder for modification and further use.
f) Now we are going to edit our config file. To do this, change the build parameters first:

On this screen, we set the parameter “Test kind” to “Suite” and assign the path to the xml config file to the “Suite” parameter. The config file is located inside the project folder.
g) Let’s take a closer look at the TestNG configuration file and edit it for our case. The default config file created by the IDE is as follows:
Here:
a) – This tag defines a set of our tests.
b) – This tag defines test parameters.
c) and – These tags define which classes will be used in this test.
Inside the tag, we can specify which methods from this class we will use. For simplicity, we will use one class – Experitest:
We could finish the configuration on this, but since we plan to run several instances of our test, we need parameterization. Let’s add the relevant tags to the code:
Here:
a) The “platform” and “browserName” tag names are parameters that we specified when we started the Selenium grid node instances.
b) The “remote URL” is a parameter that determines which instance of the Selenium Grid client will be used by a certain machine. I remind you that you can see this parameter in the hub console:
Tip here:
Please note that the tag is specified in the XML file at the beginning of this test description, before specifying classes. This is necessary that parameterization is relevant to all classes used in this test.
From the example of config file shown above it follows, that we need to make as many copies of the section inside the test tag in the configuration file, as the number of instances we plan to use. In our case, there are 2 instances, so update the config file as it is shown below:
Please note that:
a) We also changed the name of the tests – They must be unique.
b) We add parallel=”tests” into the tag. – This is a very important part. This parameter controls concurrency. In this case, it indicates that tests from this suite should be performed in parallel. More info you can get from the official TestNG Documentation (p 5.11). This is the reason for using TestNG in our case because, in reality, the distributed system assumes the execution of tests simultaneously, that is, in parallel.
h) Now that everything is ready, we can proceed to writing the test itself. Let’s return to ParallelTest.java file. To begin with, we will add the ability to use parameters for each test instance. To do this, add @Parameter annotation and update beforeTest method as follows:
i) Now add the capability to this method – we indicate the browser used, the platform, the version. These parameters should coincide with what we determined for each specific Selenium node:
j) Create a new instance of the driver, taking into account capability and remoteurl. Also pay attention at the necessity to add an exception to this method to use remoteurl; if you use IDEA IDE, you will be prompted to do it.
Tip:
If you fear your test will not be launched simultaneously on all machines, because of network delays, then you can add Thread.sleep(3000); at the end of beforeTest method. This will alleviate possible problem a little.
Let’s go to the main test:
k) Add navigation to the experitest.com website and check the title of the page, and then output the result of our test to the console:
5) Everything is ready, now we can run our test. To do this, you should build the project first, and then run it:


That’s it! Now you know how you can run Selenium tests in the distributed mode. We looked at a simple example of two slaves and two instances, using any version of Chrome version, but following these instructions you can experiment with the configurations of your slave machines to achieve better coverage and test results. This project you can download at at the following link.
Final tips:
a) If you use different browsers, systems, or have something else, that should be taking into account, then in the beforeTest method, you should define them using a consistent set of “if” operands, like it is shown below:
b) To automate the process, you can use sh / bat scripts, or even a CI tool, for instance, Jenkins, to autorun maven projects.
And for more information about Selenium and Selenium tests you can always take a look at Experitest’s Selenium Webdriver integration.
Maxim Babilo – Performance Engineer ISSArt QA team
[/vc_column_text][/vc_column][/vc_row]
You Might Also Like

Why Most Financial Application Failures Aren’t Caught Before Release
A customer opens their banking app to transfer money. The…

Appium and Modern Mobile Frameworks: Understanding Automation Challenges
Mobile automation has matured significantly over the past decade, largely…

The Myth of Automation Lock-In: Migrating Quantum Without Rewrites
While talking with so many enterprise QA teams as a…