Table of Contents
Table of Contents
Appium has been a cornerstone of mobile test automation for almost 15 years now. That is practically a lifetime in the rapidly evolving landscape of mobile application development. Adoption has been high as Appium helps ensure consistent quality across various devices. Its primary use is to streamline the orchestration of tests across both real and virtual devices, empowering development teams to achieve scalable and robust software quality.
The appium server functions as a powerful HTTP server that translates test commands into device-specific instructions that interact with native frameworks like xcuitest (iOS) and UI Automator/Espresso (Android). This enables the seamless automation of user interactions, validating functionality and performance across many device configurations.
Beyond its core functionality, Appium’s open-source nature remains a significant advantage. This has given rise to a vibrant and active community. It also allows for extensive customization and integration with popular CI/CD pipelines and testing frameworks. With the increasing emphasis on AI-powered testing and cloud-based device farms, Appium’s adaptability is more relevant than ever.
Integrating Appium server with continuous testing strategies is essential to achieve rapid feedback cycles and maintain high-quality mobile releases. Leveraging Appium automates regression, performance, and UI testing, ensuring consistent user experiences across the fragmented mobile ecosystem. To explore advanced Appium capabilities and enterprise-grade solutions, delve into solutions like Digital.ai Continuous Testing, which enhance Appium with AI-driven insights and cloud-based scalability, enabling organizations to stay ahead in the competitive mobile market.
Appium’s Enduring Relevance: Bridging the gap in modern web and mobile testing
The digital landscape has evolved dramatically since the early days of software testing. With the proliferation of diverse mobile devices, integrations, and progressive web applications (PWAs), robust, scalable testing solutions are more critical than ever. Appium remains a cornerstone of modern testing strategies.
The Manual and Automated Testing Paradigm
At the dawn of the smartphone age, manual testing was the primary method for testing software quality. An effective method for basic functionality checks, manual testing has proven to be time-consuming and unsustainable over time. An advancement is needed with the constant increases in software complexity and device diversity. This has led to scripted testing, using tools to automate user actions. However, traditional scripted testing approaches often struggle with cross-platform compatibility and scalability.
Appium’s continued popularity stems from its ability to address the key challenges of modern mobile and web application testing:
- Cross-Platform Compatibility: The device ecosystem remains highly fragmented. Appium’s framework-agnostic approach allows testers to write executable scripts across iOS, Android, and even web browsers, significantly reducing development effort. The ability to utilize the vendor-provided testing frameworks like xcuitest and Espresso is a huge advantage.
- Scalability and Efficiency: Appium provides integrations with cloud-based device farms, allowing for parallel testing across numerous devices and configurations. This scalability is essential to achieve rapid feedback cycles in agile and DevOps environments.
- Open-Source Flexibility and Community: Appium’s open-source nature fosters an active community that encourages continuous innovation. This translates to many plugins, integrations, and best practices that enhance testing capabilities.
- AI-Powered Testing Integration: AI-powered testing is becoming mainstream. Appium’s flexibility allows it to be integrated with AI-powered test tools that help with visual testing and self-healing scripts.
- Remote Device Access: Appium’s ability to control remote devices is more important than ever. With the rise of remote work and cloud-based testing, remote device access is a requirement.
Appium’s Unified Automation Framework
In the dynamic realm of web and mobile application testing, Appium stands out as an important open-source automation framework. Its enduring relevance stems from its ability to provide a unified approach to testing across diverse platforms and technologies.
The Power of Cross-Platform Automation
Appium’s core strength lies in its platform-agnostic nature. With the webdriver protocol, Appium enables testers to write a single set of test scripts that can be executed on both iOS and Android, as well as across various web browsers. This eliminates the need to maintain separate testing tools for each platform, significantly reducing development and maintenance overhead.
Beyond Native: Web and Hybrid App Testing
Appium’s versatility extends beyond native mobile applications. It seamlessly supports testing web and hybrid applications, ensuring comprehensive coverage across the entire digital ecosystem. This is critical where PWAs and cross-platform web experiences are increasingly prevalent.
Language Flexibility and Device Diversity
Appium’s support for multiple programming languages, including Python, Java, JavaScript, and more, empowers testers to use their preferred tools and workflows. Furthermore, Appium enables testing on real devices, emulators, and simulators, providing flexibility in test environments. The growth of cloud-based device farms makes the ability to target many real devices a must.
Modern Architecture and Enhanced Performance
Appium’s architecture, built upon the webdriver protocol, ensures robust and reliable communication between test scripts and target devices. This protocol has replaced the JSON Wire Protocol. Modern Appium implementations also focus on performance optimizations, enabling faster test execution and quicker feedback cycles, which are crucial for agile development.
From CLI to GUI and Beyond
While Appium initially emerged as a command-line interface (CLI) tool, it has evolved into a user-friendly desktop application with graphical user interfaces (GUIs) for Windows, macOS, and Linux. Appium’s integrations with cloud-based platforms and AI-powered testing tools further enhance its capabilities, making it an essential component of modern test automation strategies. The ability to use Appium and other GUI-based tools is a huge advantage.

Appium’s Modern, Scalable Architecture
Here’s a breakdown of Appium’s core components:
- Appium Server:
- The heart of Appium, the server, is built on Node.js and is deployable to local machines or cloud infrastructure.
- Receives test requests from Appium client libraries via the WebDriver protocol, replacing the older JSON Wire Protocol.
- The server then routes these requests to the appropriate device drivers (e.g., XCUITest driver, UIAutomator2 driver) to interact with native testing frameworks.
- Appium Server supports concurrent sessions, enabling parallel testing across multiple devices.
- Appium Client Libraries:
- Appium client libraries, available in various programming languages (Python, Java, JavaScript, C#, etc.), simplify test script creation.
- They use the WebDriver protocol to communicate with the Appium Server, initiating test sessions and receiving test results.
- Client libraries are constantly updated to work with the newest Appium server features.
- WebDriver Protocol:
- Appium leverages the WebDriver protocol, a standardized communication protocol, for client-server interactions.
- It provides a robust and reliable way to automate web and mobile applications.
- This protocol allows for more modern interactions and better stability than the older JSON Wire Protocol.
- Appium Drivers:
- Appium’s platform-agnostic nature is facilitated by its use of device-specific drivers:
- UIAutomator2 is the primary driver for modern Android testing.
- Espresso is another Android driver that is gaining popularity.
- XCUITest is the driver for iOS testing.
- WinAppDriver is used for Windows application testing.
- These drivers act as bridges, translating WebDriver commands into device-native instructions.
- Appium’s platform-agnostic nature is facilitated by its use of device-specific drivers:
- Native Automation Frameworks:
- Appium relies on native automation frameworks to interact with devices:
- UIAutomator/Espresso (Android): Provides access to Android’s UI elements and functionalities.
- XCUITest (iOS): Enables testing of iOS applications.
- These frameworks are provided by the operating system vendors, ensuring compatibility and performance.
- Appium relies on native automation frameworks to interact with devices:
How Appium Works:
- A test script, written using an Appium client library, sends WebDriver commands to the Appium Server.
- Based on the desired capabilities (device name, platform, etc.), the server routes the commands to the appropriate device driver.
- The driver translates these commands into instructions the native automation framework can execute.
- Test results are sent back through the driver, server, and client library.
- The use of desired capabilities is still how Appium differentiates between device types.
- The removal of the bootstrap.js/bootstrap.jar is also a major change. Appium now communicates directly with the native testing frameworks.
Appium in Action
Appium’s ability to seamlessly automate testing across Android and iOS devices is a key strength. Here’s a look at how it operates on each platform:
Appium on Android Devices:
- Session Initiation:
- The client machine sends a request to the Appium Server via the WebDriver protocol by using an Appium client library to initiate a new test automation session.
- Server Routing:
- The Appium Server analyzes the desired capabilities specified in the request, identifying the target platform as Android.
- The server then routes the commands to the appropriate Android driver, typically UIAutomator2 or Espresso.
- Native Framework Interaction:
- The Android driver interacts directly with the UIAutomator2 or Espresso framework, which are native Android testing frameworks.
- The need for the bootstrap.jar file has been removed. Appium now communicates directly with the native testing frameworks.
- Test Execution and Results:
- UIAutomator2 or Espresso executes the test commands on the Android device (real device, emulator, or simulator).
- Test results and logs are then relayed back to the Appium Server, which, in turn, transmits them to the client.
Appium on iOS Devices:
- Session Initiation:
- Like Android, the client machine sends a WebDriver protocol request to the Appium Server to start a test session.
- Server Routing:
- Upon identifying iOS in the desired capabilities, the Appium Server directs the commands to the XCUITest driver.
- Native Framework Interaction:
- The XCUITest driver interacts directly with the XCUITest framework, Apple’s native iOS testing framework.
- The need for the bootstrap.js file has been removed. Appium now communicates directly with the native testing frameworks.
- Test Execution and Results:
- The XCUITest framework executes the tests on the iOS device (real device or simulator).
- Test results and logs are sent back to the Appium Server and then to the client.
Understanding Appium’s WebDriver Protocol
As Appium has evolved, the WebDriver Protocol has become the standard for communication between client libraries and the Appium Server. It replaces the older JSON Wire Protocol, aligning Appium with modern web automation standards.
Here’s a breakdown:
- WebDriver Protocol:
- Is a W3C (World Wide Web Consortium) standard, designed to provide a platform and language-neutral way to automate web browsers.
- Appium has adopted the WebDriver protocol to extend its automation capabilities to mobile applications.
- It defines a set of commands and responses that enable client libraries to interact with the Appium Server.
- It is a restful Web service.
- Why the Transition?
- The WebDriver protocol is a more modern, standardized, and robust protocol than the JSON Wire Protocol.
- It offers better compatibility with web automation tools and frameworks.
- Brings improved stability and performance to Appium automation.
- Appium Architecture and WebDriver:
- Communication between client libraries and the Appium Server is now facilitated by the WebDriver protocol over HTTP REST requests.
- This enables Appium to maintain its cross-platform and language-agnostic capabilities as the server handles protocol-level communication.
- How it Works:
- Client libraries send HTTP requests containing WebDriver commands to the Appium Server.
- The server processes these commands and routes them to the appropriate device driver.
- The driver executes the commands on the target device and sends responses back to the server, relaying them to the client.
- Example interactions include creating a new session or finding elements within the application under test.
Installing Appium: Server and Desktop Options
Appium’s core functionality remains consistent, though installation practices and usage patterns have evolved. The offering is flexible deployment, catering to both interactive development and automated CI/CD pipelines.
Appium Server vs. Appium:
- Appium Server (CLI):
- This is the foundational component: a Node.js server that handles test automation requests.
- Essential for integrating Appium into CI/CD pipelines, where automated scripts manage test execution.
- Installation is typically done via Node Package Manager (npm).
- Appium (GUI):
- Provides a user-friendly graphical interface for managing Appium sessions and inspecting application elements.
- Includes Appium, a valuable tool for analyzing UI elements and generating test locators.
- Simplifies initial setup and debugging, making it ideal for development and troubleshooting.
- Important to note that when using the newest features, the Appium server is the most reliable.
Installation Best Practices
- Node.js and npm: Ensure you have installed the latest stable versions of Node.js and npm. Appium Server relies on these for its operation.
- Environment Variables: Properly configure environment variables (e.g., JAVA_HOME, ANDROID_HOME) to ensure Appium can locate necessary dependencies.
- Driver Installation: Install the required device drivers (e.g., UIAutomator2, XCUITest) based on your target platforms.
- Cloud Integration: Many teams are running Appium in cloud-based device farms.
- CI/CD Integration: For CI/CD pipelines, use npm to install the Appium Server as a dependency.
- Create scripts to start and stop the Appium Server as part of your build and test processes.
- Appium: Appium is a valuable tool that should be used when creating new tests.
Step 1: Install Node.js
As Appium is written in Node.js, you need to install Node.js first to use Appium. Visit the Node.js website to download the software.
For detailed installation instructions and downloads for both MacOS and Windows, refer to the following resource. Depending on your machine, select that OS from the drop-down menu.
Step 2: Install Appium from the Command Prompt
- Open the command prompt as an administrator and type the following command: Npm install -g Appium
- The npm package manager will start the installation procedure.
- After a successful installation, you can start using Appium.
- To open Appium from the command line, type Appium followed by the IP address and the server port number.
GUI-based Appium Installation
- Download and install Appium: To download and install Appium, visit the Appium website: Https://Appium.io/
- After successful installation, open Appium.
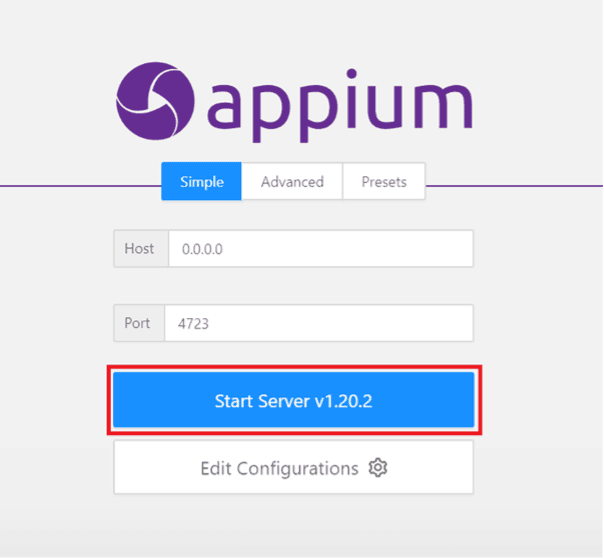
- Appium will prompt you to enter the host IP address and server port number on the opening screen.
- Appium is an HTTP server only. You need the client libraries to request and perform operations on end devices. It is important to configure the server port when you start Appium. The server port is what the client connects to and communicates with Appium. The default server port is 4723. When connecting to the client machines, specify this server port.
- To change the server port, click the Advanced Tab to see a screen with server configuration settings. Enter the details and Start Server.
- If you want to save these settings for next time, save them as a preset and choose the preset tab settings when you open Appium next time.
- Appium is an HTTP server only. You need the client libraries to request and perform operations on end devices. It is important to configure the server port when you start Appium. The server port is what the client connects to and communicates with Appium. The default server port is 4723. When connecting to the client machines, specify this server port.
- Appium is ready for use.
Drive SDLC Success with Appium and Continuous Testing
Continuous testing is necessary for organizations delivering high-quality web and mobile applications. Appium’s pivotal role in the process enables organizations to achieve seamless and efficient continuous testing workflows. Its seamless integration with CI/CD pipelines facilitates automated test execution at every stage of the SDLC, enabling rapid feedback and ensuring early issue detection. Cloud-based Appium device farms also empower parallel testing across numerous devices, significantly accelerating the overall testing process.
Continuous testing tools have transcended basic functional checks, encompassing performance, functional, and accessibility testing, all seamlessly automated and integrated within the CI/CD pipeline. In conjunction with Appium, cloud-based testing platforms deliver on-demand access to a broad spectrum of real devices and simulators, facilitating comprehensive testing across diverse configurations.
Benefits of Appium in Continuous Testing:
- Increased Test Coverage: Automated testing across multiple devices and platforms ensures comprehensive coverage.
- Faster Feedback Cycles: Rapid detection of issues enables quicker resolution and faster release cycles.
- Improved Software Quality: Continuous testing helps maintain high-quality standards throughout the development process.
- Reduced Manual Effort: Automation reduces the burden of manual testing, freeing up resources for other tasks.
- Enhanced Collaboration: Shared test results and insights facilitate better collaboration between development and QA teams.
Connecting Digital.ai Continuous Testing to Appium
Digital.ai Continuous Testing is a scalable web and mobile application testing tool that allows testing teams to fully automate functional, performance, and accessibility scenarios on real devices and browsers in the cloud.
Continuous Testing is fully compatible with tools like Appium and Selenium, along with:
- Standard automation drivers
- Continuous integration (CI) environments
- Automation frameworks
- Native mobile testing frameworks
- Programming languages
- Integrated development environments (IDEs)
- Native mobile application development tools
Here is a step-by-step guide to connecting Digital.ai Continuous Testing with Appium for Windows.
Appium is an open-source application for Mac, Windows, and Linux. It allows the users to automate mobile scripts with a flexible UI. Integrating Continuous Testing with Appium will enable users to inspect on real Android and IOS Devices. The latest Appium can be downloaded from Appium Desktop Github Page.
Let’s learn how to use Appium Inspector with Digital.ai Continuous Testing.
Start the Server: Start up the Appium Application to bring up the new session window, and start the server in “Simple” mode.
Connect to your Digital.ai Continuous Testing Cloud* instance
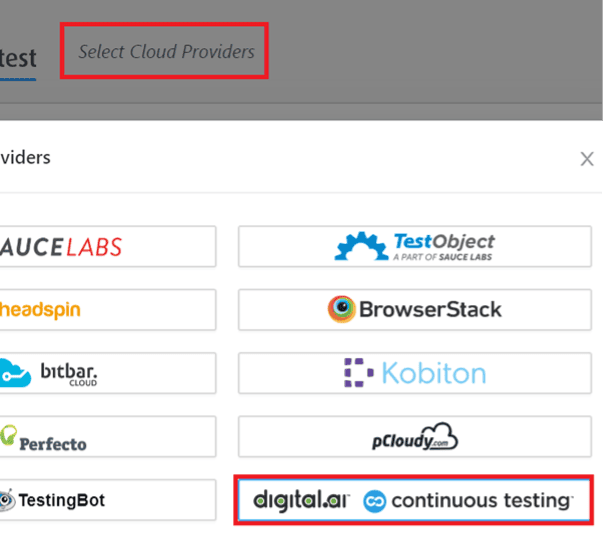
1. Click on “Start Inspector Session“

2. From the Cloud Providers, choose “Digital.ai Continuous Testing”
3. Populate the URL of your Cloud and Access Key

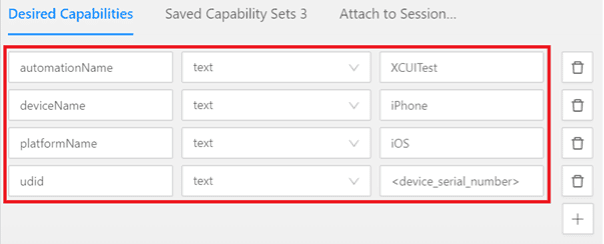
4. Populate the Desired Capabilities – We need to populate the capabilities to point the Appium instance to a device we want to work with
Basic iOS Capabilities
automationName – XCUITest
deviceName – Name of the target device, but can be generic, such as “Samsung”
platformName – iOS
udid – Device Serial Number
iOS Application Capabilities
To install and launch an application, the following capabilities are required:
app – cloud:<Name of Bundle Identifier>
bundleId – Bundle Identifier of the Application

To simply launch an application, the following capabilities are required:
bundleId – Bundle Identifier of the Application

iOS Browser Capabilities
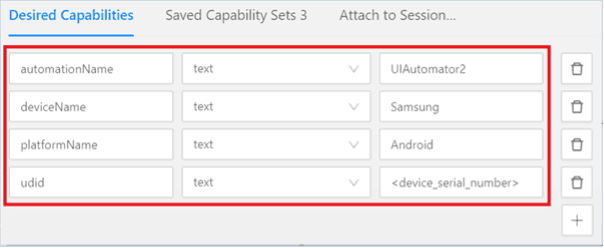
browserName – Safari

automationName – UIAutomator2
deviceName – Name of the target device, but can be generic, such as “Samsung”
platformName – Android
udid – Device Serial Number
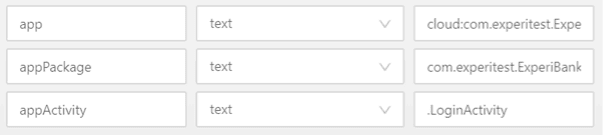
Android Application Capabilities
To install and launch an application, the following capabilities are required:
app – cloud:<Name of AppPackage/appActivity>
appPackage – Package Name of the Application
appActivity – Activity Name of the Application
To simply launch an application, the following capabilities are required:
appPackage – Package Name of the Application
appActivity – Activity Name of the Application

Android Browser Capabilities
browserName – Chrome

Start Session
Once all the necessary capabilities are populated, we can “Start Session”

That’s it. Happy testing!

Appium–A Scalable Solution for Automated Continuous Testing
Appium’s robust architecture, cross-platform capabilities, and seamless integration with modern testing ecosystems solidify its position as a cornerstone of automated continuous testing. Its ability to scale testing efforts across a diverse range of devices and environments, coupled with its adaptability to AI-powered and cloud-based testing strategies, ensures its continued relevance in the years to come.
To experience the full potential of Appium in your testing workflows, explore advanced solutions that enhance Appium’s capabilities, such as those provided by Digital.ai Continuous Testing. Our tool offers AI-driven insights, cloud-based scalability, and enterprise-grade support, enabling you to achieve unparalleled testing efficiency and quality. Discover how these advanced platforms can empower your team to deliver exceptional digital experiences confidently.
To discover more about Digital.ai Continuous Testing, sign up for a free trial now.
*When using Appium Inspector, users might notice the use of Experitest logos and terminology. These are being updated by Appium and we hope to see them in place soon.
Author
Jonny Steiner
Discover more about Digital.ai Continuous Testing
Explore
What's New In The World of Digital.ai

Start Testing Samsung Galaxy S26 Series Today with Digital.ai Testing
Samsung has officially introduced the Galaxy S26 series, continuing its lineup…

Android 17 Beta Support Now Available with Digital.ai Testing
As we move closer to the anticipated release of Android 17 —…

Accelerating Test Creation using LLMs
Manual Testing Bottleneck Over the past couple of decades, software…
